Notes editor.
You can edit notes for the photo to be taken, for the photo that is being previewed or for already existing photo-points.
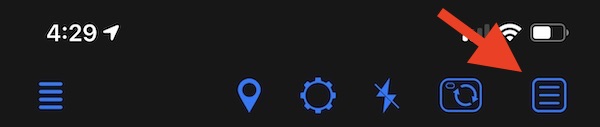
Notes editor button is located in the top toolbar:
By default, all of the note fields are either pre-filled automatically or are empty. Here is the editor screen:
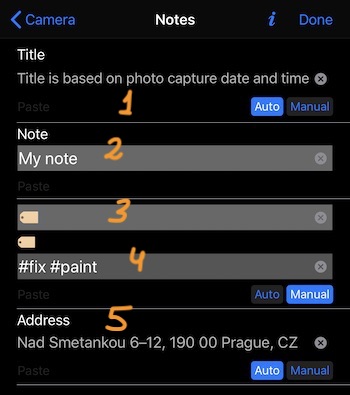
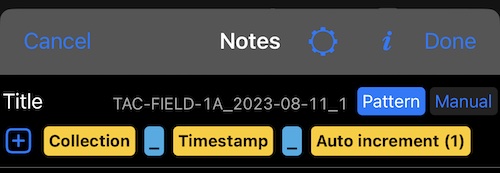
By default, photo title (1) is pre-populated by the date-time. To change this to your own title, tap on a “Manual” button under the Title field and enter your own title.
Next field, Note (2). By default it is empty; add your own text here if you need it.
Next field (3), a name you’d want to use for the photo category, tag, folder. By default the app will keep it as empty.
Next (4), tags, folder. By default pre-populated by the folder/collection name that is used for the photos currently. Tap on manual to enter your values.
Next, Address (5). By default is pre-populated by the address found based on a current coordinate. Tap on “Manual” if you want to enter something else here.
For the notes setup above, let’s see what the notes on the camera will look like:
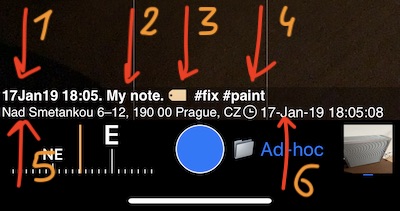
1 is auto generated title, based on date and time (as we left title as “Auto” in the Notes editor).
2 is a note entered in the notes editor.
3 is a name or symbol we entered in the notes editor to “name” the tags/folder field (my favorite is Tags or Folder, but emoji also looks alright here).
4 are our “tags” we entered in the notes editor. If we leave this field as “Auto”, the folder name would be here (currently “Ad-hoc” as screenshot shows).
5 is the address. We left this field as “Auto” populated, thus the address was found based on the current coordinates and used here.
6 is a timestamp. Timestamp can’t be edited in the notes editor, though you can pick from many time stamp formats and hide it altogether, if needed. See settings for more information on timestamp.
Hope my explanations didn’t make it look more complex than it really is! And I hope this part is flexible enough. Actually you don’t need to be driven by conventions of having any tags/folders etc, you can just cram whatever you want in the note fields.
There is also an option in settings to hide the notes overlay in its entirety.
If you are into configuring/customizing these camera texts/overlays, be sure to review a camera settings doc page: settings or Notes overlay settings.
How to edit notes for the existing photo-points? Open the points list, tap on a photo in the point row to open the photo preview/editor and use the notes button.
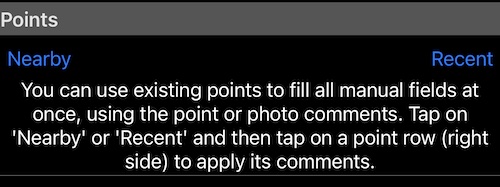
From version 3.7, you can also re-use comments from any existing point/photo, filling all manual fields in the comments at once.
Can be great for re-inspections where comments/title from the previous inspection points/photos can populate all of the manual fields for the new points/photos.
Version 3.8 adds:
- QR, barcode or text scanner in the notes editor. Allows you to extract text and assign it to note fields.

Version 3.9 adds:
Photo title pattern that goes beyond the timestamp in the automatic photo title, giving you options to be more creative and productive by creating the automatic title that just makes sense for your work.
Related pages:
- Notes overlay settings.
- Backup/share the app settings , so you can have multiple settings profiles for different jobs/workflows, restore when needed or quickly onboard someone else.