Simple receipt
The simple receipt is what most drivers hand over: one page, the fare, and nothing the passenger has to read twice. It is the receipt the app shows by default.
You reach it from the receipt button on the meter as soon as you end a trip, or from any past trip in the trips log .
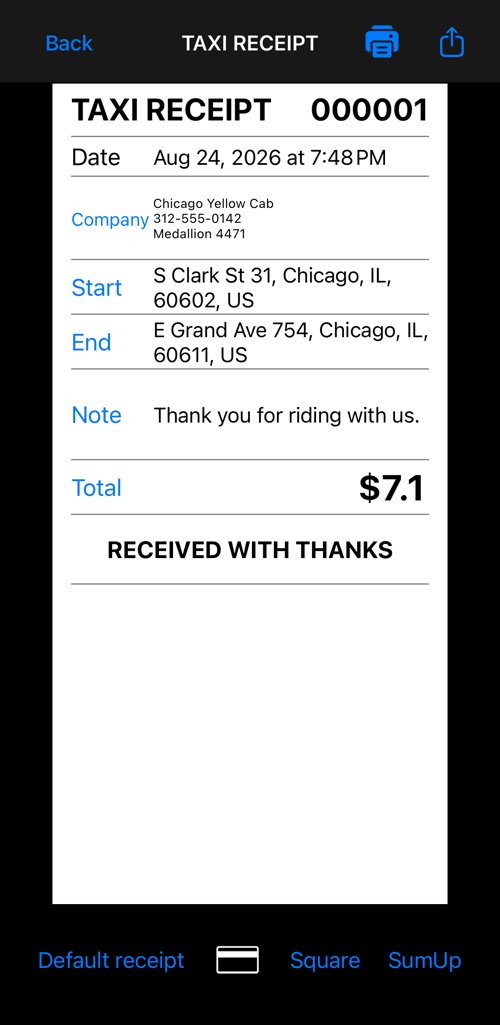
On the receipt
- Header — the line at the top. It says TAXI RECEIPT until you set your own text in advanced settings .
- Receipt number and date. The number is issued automatically; you can give it a prefix, pad it with zeroes or take over the sequence yourself — see advanced settings .
- Company — your firm, phone number, licence, anything you like across several lines. It is also a button: tapping it opens advanced settings at the field that fills it.
- Start and End — the pickup and the destination. Both are buttons, so you can type an address in on the spot. They fill in by themselves if you switch on automatic address resolution in advanced settings .
- Note — free text for this one receipt. You can also set a note every receipt starts with, and a fixed footer line the driver cannot change.
- Total — the amount charged, and a button. Tap it to adjust the total: the meter says 9.40, the passenger says “make it 10”, and 10 is what the receipt shows. The difference is recorded as a tip or a discount, and the detailed receipt prints it as its own line. More in adjusting the trip total .
At the top and the bottom of the screen
- The printer button prints the receipt on a Bluetooth receipt printer, and its colour tells you whether the printer is ready. See printing .
- The share button sends the receipt as a PNG image or as a PDF document, through any app on the phone — mail, messages, whatever the passenger asks for.
- The button at the bottom left switches between this receipt and the detailed one . Whatever you pick stays picked for the next trip.
When the total cannot be adjusted
The Total button is live for the trip you have just finished. Open the same receipt later from the trips log and the total is shown in black and does not respond — the fare is settled. Adjust it before you clear the trip.
On Android
The same receipt, with two differences worth knowing:
- The button at the bottom left is a toggle — tap it and the receipt flips between simple and detailed. On iOS it opens a list of receipt types.
- A gear icon sits in the top bar next to print and share, and opens advanced settings directly. On iOS you get there by tapping the Company field.
More about receipts:
Detailed receipt ▪︎ Printing ▪︎ Advanced settings ▪︎ Sales tax ▪︎ Adjust total