GPS Tracking
Available with PRO upgrade.
RECORDING A TRACK
If this is the first track to record in the app, then “start tracking” button is readily available here:

If this is not your first track to record then the app shows track duration and distance at this place and you start new track via MENU button:

And NEW TRACK in the menu:

To stop track recording, please use MENU > STOP TRACK.
VIEWING SINGLE TRACK
MENU > TRACKS will show you the list of tracks:

“Last 10” is a filter button - to give you ability to filter tracks by start or end date or just show last X tracks. Tap on a track row to see the detailed track view:

Functions common to all track view types:
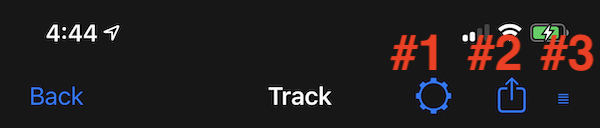
- (#1) Settings button on top of the screen allow to switch between different track views.
- (#2) Action button on top allows to share the track in many different ways. We encourage you to try sharing as a “track image”, we tried to create a “postcard” sharing experience for this. Should be looking lovely when sharing via email, Facebook, etc.
- (#3) Grid button top-right allows to either move the track to a different trip or pin it to the main map so you can retrace it.
Trim track at the end.
From version 3.5, button #3 also allows to trim track’s end at the point of that blue cursor. Use the bottom chart section to set that blue cursor to the required point and tap of button #3 > Trim. Useful for when you forgot to pause or turn off recording and then have very long sections of non driving data.
Edit track name/name, start/end address.
Tap on the orange button with the track name and note to open the track fields editor and edit track name, note, start and end address, if needed: Track fields editor
Functions specific to a Map + Chart type of view:
- Use +/- button in the time span area to zoom in and out the area around the light blue point line.
- Move the light blue point line to focus on any point in time, light blue arrow on a map also moves to show you the corresponding location on the map.
- Pan and drag on the chart black area to zoom in and out and focus on the part of the track you are interested in.
- When chart is zoomed, you can either tap on it to move the light blue point line to the place of your tap or you can use the grey area at the chart bottom to control the light blue point line
More on a track view types:
What else can be done?
- View tracks colored by speed or altitude
- Retrace a previously recorded track
- Move track to a different trip (just swipe on a track row to see the “Move” option)
Trim track at the end
From version 3.5
Can be useful when you forgot to turn off recording and then have long sections of non activity data at the end.
MENU > Tracks > Tap on the track row. Scroll your finger through the bottom chart section to set the blue cursor on the map to the required point (or time/distance) and tap on a button #3 in the top toolbar:
Pick “Trim at …” - this menu button will show at what time/distance the truncation will happen.
REVIEWING ALL TRACKS UNDER THE TRIP
MENU > TRIPS.
When in the “Trips” list:
![]()
Tap on the “list” button (arrow 1) to see all the tracks in this trip (sorry we are using a different trip tracks in the following image, “Parndorf” trip had only one track…):

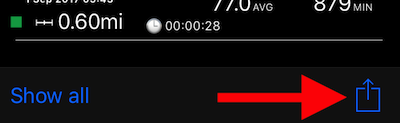
We can see complete list of tracks for this trip here and by default the last track is only shown on the map.
You can show all trip tracks on the map at once by tapping on “Show all” (arrow 1) button:

Trip and tracks list sharing options are available by tapping on action button (arrow 2).
By tapping on a specific track row, you’ll get it isolated and highlighted on the map:

This is it for the viewing options.
SHARING TRIPS
To backup or share the whole trip data to continue with it on a different device.
MENU > TRIPS and then there is a “list” button on the left of each trip row:
![]()
In the screen that opens, use right bottom action button:
[ ](../../speedometer/gpstrack/Simulator Screen Shot Sep 1, 2017, 6.05.12 AM.png)
“Save file” will offer to pick the sharing format (whole “Trip archive” or Google kmz) and will offer to save to iCloud, Dropbox etc. “Email file” option only gives email option.

When saving file pick “Trip archive” and save it to iCloud or Dropbox. Then on any iPhone or iPad you can open this trip archive (with extension of .trk) in speedometer app. Trip with all its tracks will be imported as they were on the original iPhone/iPad.
To share the whole trips with all its tracks as a single KMZ (Google Earth) file.
Same as above, but pick “Google Earth KMZ” when using “Save file” or “Email file” options.
Exporting list of trips.
Use filter to only show trips started or finished in the certain month if you need to create a list only for that month.
Then use action button to open the preview with the list of the filtered trips. Preview window has its own action button to do “whatever” with the list, open in Numbers/Excel, send by email, save to iCloud/Dropbox, unlimited options here.
SHARING SINGLE TRACK DATA
Exporting tracks in GPX, Google Earth KML (gx:Track or gx:Geometry) formats
Use action button on top of the single track view to open the export and sharing options:

Pick either “Save file”, “Email file” or “Share track image”.
Options “Save file” and “Email file” will ask for the target format. You can pick from GPX, Google Earth gx:Track or Google Earth gx:Geometry.
From version 1.8 “Share track image” is a very nice looking option to share via Facebook, email or even attaching track to notes app. Try it!
In version 1.9 (currently in beta) new option is added - “Photo GPX”. This option guarantees that you’ll have a timestamp with a location for every second in the exported file. This is needed to match GPX track to photos in the Adobe Lightroom.
Replay tracks and show elevation/speed profile in the Google Earth on PC/Mac
Exporting list of tracks.
Use filter to only show tracks started or ended in the certain month if you need to create a list only for that month.
Then use action button to open the preview with the list of the filtered tracks. Preview window has its own action button to do “whatever” with the list, open in Numbers/Excel, send by email, save to iCloud/Dropbox, unlimited options here.

MOVING TRACK BETWEEN TRIPS
In the track list swipe on a track row from right to left to reveal the Move option:

TRACKS IMPORT
When you share the whole speedometer trips archive/backup as described in section “Sharing trips” you just open the .trk file with Speedometer and it automatically recreates all of the data in the trip backup/archive.
Another option is open GPX file with Speedometer. Speedometer supports importing tracks, waypoints and routes from the GPX. More information here:
Importing tracks, waypoints and routes.