Map elevation — the height of any point on the map
How high is the pass at the top of that road? How much climbing is between you and the top of the hill? Move the map so the red arrow sits on the place, and the row under the map shows its terrain elevation, next to its coordinates, its distance and bearing from you, and the nearest address.
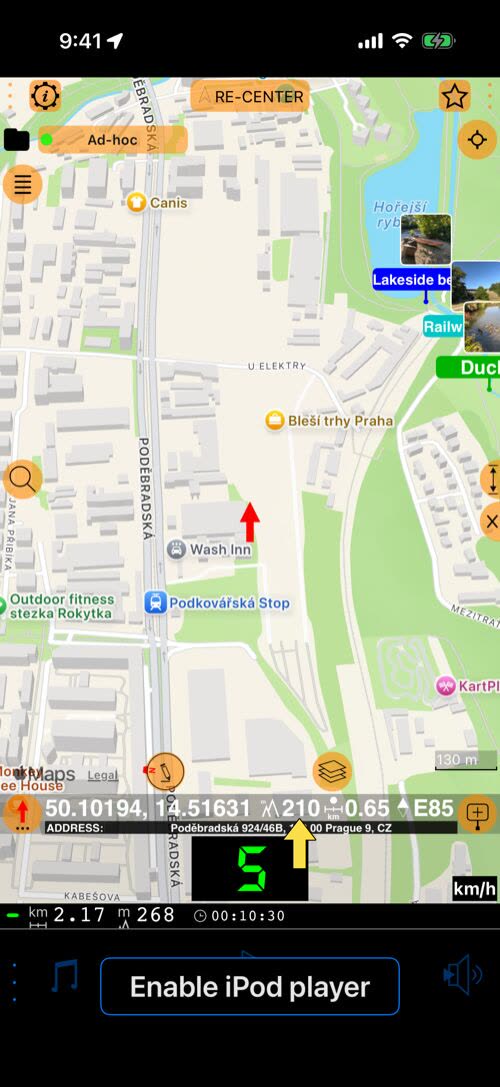
Point the red arrow
- At first the map follows your location, which stays in the middle of the map.
- Move the map with your finger. The map stops following you, a red arrow appears in the middle, and the row under the map describes the point under the arrow.
- Tap the map to show the zoom buttons. Zoom out to see the whole route or valley, then zoom in to place the arrow precisely.
- Tap
RE-CENTERat the top of the map to follow your location again.
Moving the map leaves follow mode because Cancel centering mode on map move is on by default. The common map settings can also return the map to follow mode by itself when you stop moving it.
What the row shows
- Coordinates of the point under the arrow, in the coordinate format you chose.
- Elevation of the ground at that point, in your altitude unit (feet or meters).
- Distance from your current location, and the bearing to the point.
- The nearest address, on the line below.
The elevation belongs to the point under the arrow, so it clears while you move the map and the new value appears a moment after the map stops. To hide or show the row, tap the red arrow and choose Hide red arrow details or Show red arrow details.
Where the height comes from
The row shows terrain elevation: the height of the ground at that point, looked up from a terrain model. It is not the altitude on your dashboard, which comes from the GPS or the barometer ( why GPS altitude can be off by tens of meters ).
- It needs a connection. Each point is looked up online. With no connection, or in a place the terrain data does not cover, the elevation shows
----. Offline maps still show the map, but not the elevation. - Roads, fields and broad hills read true. Open ground is where the terrain model is at its best.
- Needles, spires and steep rock domes read lower. The terrain model describes the ground in small cells, and a thin peak is narrower than a cell. The Aiguille du Midi reads 3,695 m against its famous 3,842 m, and Rio’s Sugarloaf 328 m against 396 m.
- On a summit, every few meters count. Close to a sharp top the reading drops quickly. Move the arrow around the top to find the highest reading.
Plan with it
- The road ahead. Check how high a mountain pass, a viewpoint or tomorrow’s stop is before you set off, and how much the road climbs from where you are.
- The climb on a bike or on foot. Compare the top of the hill with your own altitude to see how much is still above you.
- A reference for the barometer. On open, flat ground, put the arrow where you stand and use its elevation as the reference altitude for the barometric altimeter . It is usually closer to the truth than the GPS altitude.
- Take-off and landing. Check the elevation of a take-off or landing field before you fly ( paragliding mode ).
Keep the height with a waypoint
The add-waypoint button at the right end of the row saves a waypoint at the arrow, with the elevation the row shows. If the row shows ----, because the reading has not arrived or there is no connection, the waypoint starts without an altitude. You can add it later: open the waypoint, expand Altitude, tap Find on the Terrain row, and then Apply (
the waypoint editor’s altitude section
).
A waypoint whose altitude came from the terrain shows it without a GPS accuracy (±) value in the waypoints list, because the height was not measured by GPS.
