Video recording, replay, and data overlays
Compass 55 can work as an action camera on the move or a survey camera in the field. A recording keeps the clean original video together with the location and motion data needed for replay, subtitles, photo and waypoint creation, and optional stamped exports.
The data overlays do not have to be permanently burned into the original. During replay or export, you can use the layout saved when the video was recorded, apply your current layout, or view the video with no overlays.
Compass 55 Free stores one video and lets you share any selected 15-second clip with app branding. To record another video, open MENU > VIDEOS and delete the current video. The in-app
PRO PACK upgrade
unlocks unlimited stored videos and full-length or clean-original exports.
Open the Video camera
Open MENU > VIDEO. Compass 55 opens its camera in Video mode.
Before recording, frame the view, select the front or back camera if needed,
check the microphone indicator, and open Settings if you want to change
recording or overlay options.

Viewfinder controls
The central shutter button starts and stops recording. While recording, its appearance changes and the elapsed recording time is shown beside the viewfinder controls.
The Photo/Video control switches capture mode. During a video recording, use the separate camera button to take a location-aware photo without stopping the video.
The microphone control shows whether audio is available and, when enabled in Video settings, displays a live audio level:
- a live level confirms that the microphone is receiving sound;
- tap the microphone to mute or unmute recording audio;
- the mute choice is remembered for the next recording;
- if microphone permission is unavailable, video can still be recorded without audio.
When Loop recording is enabled, a badge shows the retained Loop duration.
The navigation-bar controls provide:
Videosfor the saved recording library;- camera selection for the front, back, or another available camera;
Notesfor the Video title, note, tags, and address;Settingsfor Video recording, overlays, file naming, and related camera options.
Record a normal video
Tap the shutter button once to start. Confirm that the duration is advancing and that the microphone state is what you expect. Tap the shutter again to stop.

The saved video appears in MENU > VIDEOS. A recording can briefly show as Processing
while the app prepares it for replay and makes its recorded data
self-contained. You can start another recording when the camera becomes ready;
you do not need to keep the Videos list open while preparation finishes.
The recording remains useful if preparation is interrupted. The app keeps the playable original and its recoverable data rather than discarding the whole recording.
Take a photo while recording
Tap the small camera button in Video mode to take a still photo while video recording continues.
The photo uses the location and camera state from the moment you tapped the button. It follows the normal photo save and waypoint workflow and does not replace or split the active video.
Loop recording
Loop recording continuously keeps only the latest configured duration. Older completed parts are removed while recording, and tapping Stop saves the retained window as one video.
This is useful when the important event may happen after a long uneventful period: you can keep a recent window without saving one indefinitely growing file.
Loop recording works only while the camera remains visible. Closing the camera or moving the app to the background stops and saves the retained recording.
To configure it, open Settings > Video settings, turn on Loop recording, and
choose:
Keep latest— the duration retained when you stop;Loop stabilization—Responsive,Auto, orOff.
Responsive is the recommended starting point for an accurately bounded
rolling window. Auto can provide more smoothing but may take longer to finish
after Stop. Use Off only with a stable tripod, gimbal, vehicle mount, or for
troubleshooting.
Video settings
Open the camera, tap Settings, then choose Video settings.

Recording
Video quality controls the capture resolution used for new recordings.
Notify when recording stops unexpectedly can add a system notification after
the app saves a video stopped by an interruption. The app also shows an in-app
message when possible. Pressing Stop normally does not send a notification.
Loop recording and its retained duration and stabilization are also configured in this section.
Audio
Microphone sets whether new recordings start with audio On or Muted. You can
still change the microphone from the viewfinder.
Audio level before recording opens the microphone while you are framing and
shows its live level. Turn it off if you do not want the microphone opened until
recording starts.
Stabilization
Standard is the recommended normal-recording setting. It balances stable
video with responsive starting and stopping.
Auto allows iOS to choose stronger stabilization. It can crop more of the
frame and may take longer to finish after Stop.
Use Off for a stable tripod, gimbal, vehicle mount, or troubleshooting.

Overlays
Video overlays opens the layout editor for the data and identity panels used
during live Video mode, replay, and stamped export.
Export
Include subtitles adds an SRT file containing time, location, altitude,
heading, and related recorded telemetry.
Subtitle units chooses between the app’s currently selected units and fixed
metric values suitable for editing tools.
Export quality offers:
Sourceto stay close to the recorded video quality;Smaller fileto use stronger compression for sharing.
Keep audio in exports controls whether exported videos contain sound. With
Source quality and audio kept, a full Original export can share the stored MOV
directly when no additional metadata preparation is needed.
Build the Video overlay layout
Open Settings > Video settings > Video overlays.
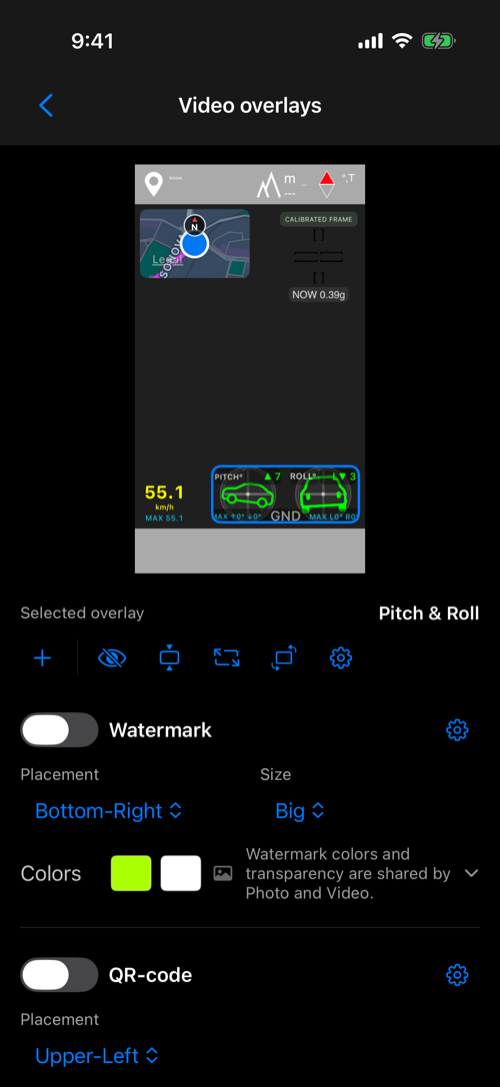
The top of the screen is a preview of the camera canvas. Tap an enabled overlay to select it, or drag it toward another corner. The highlighted corner shows where it will snap.
The controls below the preview let you:
- add a hidden overlay;
- hide the selected overlay;
- make a scalable overlay smaller or larger;
- rotate overlays that support horizontal and vertical layouts;
- configure overlay-specific content or behavior;
- move overlapping overlays toward the edge or inward in their corner stack.
The original video stays clean. This layout is saved as the recording’s Historical overlay recipe and can be changed later without rewriting the original.
Watermark
Add a company name, personal identity, vehicle, equipment label, or logo. Watermark content is shared where appropriate, while the Video layout controls its visibility, placement, size, and appearance for video.
QR Code
The QR Code can encode selected recording fields. It can turn a stamped video frame into a map or navigation link for the location represented by that frame.
The QR footprint is fixed to preserve scan reliability.
Map
The live Map overlay follows your current position and can show the trail recorded since the video started. Saved-video replay and stamped export use the recorded route data.
Map options include type, day/night appearance, zoom, orientation indicators, and optional speed-adaptive live zoom.
Speed
The Speed overlay shows the recorded speed in the app’s selected units and tracks the maximum reached so far. If a usable location fix is not available, the live value is shown as unavailable rather than inventing a speed.
Pitch & Roll
Pitch & Roll shows vehicle or device angle during the recording. Choose Ground for gravity-based angles or Relative when the current orientation should become the local zero.
The selected reference and recorded motion data are preserved so Historical replay and stamped export reproduce the recording rather than recalculating it from today’s position.
G-Cross
G-Cross visualizes lateral and longitudinal acceleration, calibration state,
and directional peaks. Its live CLEAR PEAKS action affects the recorded peak
history; replay and export reproduce the resulting history but do not expose
the live command.
Find saved recordings
Open Videos from the camera or MENU > VIDEOS.

Each ready row shows its thumbnail, title, note or location summary, recording date, duration, file size, and the overlays saved with the recording.
Use search to find text in titles, notes, tags, addresses, dates, coordinates, and other video fields. The date filter can limit the list to recent recordings or a selected month or year.
Tap a ready row to replay it. A row marked Processing becomes playable automatically when preparation finishes.
Replay and create a photo and waypoint

Replay shows the active audio output, which you can change while reviewing the recording.
In Video settings, choose Automatic, iPhone, Any external, Wired / USB, or Bluetooth as the microphone source. The active source is shown, disconnected sources fall back safely, and the app can notify you when the microphone changes. Use headphones to monitor the live microphone and keep compatible music or podcasts playing.
For fine positioning, swipe left or right directly across the video; drag upward while swiping to slow the movement.
Pause replay or scrub the timeline to any moment, then tap the camera button to create a normal Photo and waypoint from that exact video frame. The app:
- extracts the correctly oriented frame;
- uses the replay moment’s timestamp, location, heading, and resolved address;
- stores that frame address as
Manual, so it stays historical and is not replaced by later reverse geocoding; - follows your existing Photo capture preference:
Savecreates the Photo immediately,Previewopens the normal Photo preview, and automatic Photo Notes can open Photo notes automatically.
The new Photo follows normal Photo-note rules. Title, Note, and Collection are not automatically copied from the recording-wide Video notes; add them directly, or use the Notes transfer tools when the Video already has useful context.
This is useful when you notice an important place, measurement, label, or detail only after the recording has finished.
Use video and photo notes together
Photo Notes and Video Notes now include a collapsible source section. In the Photo editor it shows Video notes; in the Video editor it shows Photo notes. A replay-derived Photo shows notes from its actual source video.
Apply Title, Note, Address, Folder field name, and Tags/Folder
individually, or use Apply all. Undo reverses the most recent individual
Apply, or the complete Apply-all operation.
Clear From: and To: labels explain transfers when fields are named
differently, for example From: Tags -> To: Collection. Resolution pills
show whether a value transfers as Auto, Manual, or Auto → Manual.
Automatic title patterns transfer when compatible; historical resolved
values, addresses, and tag/folder values transfer as Manual where needed.
Find a moment inside a video
On iOS 26 or later, create a transcript for a saved video using ⋯ > Transcribe audio. You can then find a spoken comment without replaying the whole recording.
Find a spoken comment without replaying the whole recording. Open a video with a transcript and choose ⋯ > Transcript > Show transcript. Type a word or phrase in Search transcript: the list immediately narrows to matching lines, with their original timestamps.

Tap a matching line to jump straight to that moment in the video, or tap its pencil to correct the wording. Clear the search using the × inside the search field to see the full transcript again. Searching leaves the saved transcript and captions unchanged.
Original, Stamped, and overlay history
The stamp button switches between the clean Original view and the last used
Stamped overlay view.
For detailed control, open More > Overlays:
Historicaluses the immutable layout and appearance saved when recording started;Currentuses today’s Video overlay settings with the data recorded in the video;Nonehides all replay overlays.
Changing replay overlays does not modify the stored Original or the Historical recipe.
Select and export a range
Open More > Select export range.

Move to the beginning of the useful clip and tap Set Start. Move forward and
tap Set End, then tap Done. The timeline shows the selected A–B interval.
Export then offers both:
Selected rangewith its start and end times;Full video.
Each scope offers:
Originalfor a clean video without visible overlays;Stampedusing the selected Historical, Current, or None overlay mode;Overlay videosfor the data overlays alone, as separate transparent videos — see the next section.
The selected range remains available while that replay screen is open, so you
can adjust it or export more than one version. Clear export range removes it.
Overlay videos for footage from another camera
A trail is often filmed on something else: a GoPro on the roll bar, a DJI Osmo
on the helmet, an Insta360 on the bumper, a dashcam. Overlay videos exports
the data overlays on their own, as transparent videos — the gauges with nothing
around them — that you add as layers over that footage in iMovie, Final Cut Pro,
DaVinci Resolve, Adobe Premiere Pro, CapCut or any other video editor. The
gauges come from this recording’s data; the pictures come from your camera.

That is one exported file — the Pitch & Roll gauge, its own video, everything around it transparent.
Open a saved recording, then More > Full video > Overlay videos. With an
export range set, Selected range offers the same.

Choose what to export

Each selected overlay becomes its own video file, cropped to the gauge itself rather than a full frame. Four selected overlays give four files, and in the editor each is a layer you can position, scale, show, and hide on its own.
The list offers the overlays that are visible in the recording’s current
presentation: with Historical selected, the overlays saved when the recording
started; with Current, the ones enabled in your Video overlay settings today.
An overlay that is switched off does not appear.
The watermark is the one exception: it is never offered, because it never changes — a watermark video would be a still image played back. Put your logo into the editor directly instead. The QR code is offered; its payload follows the recorded location.

Resolution—4Kkeeps the gauges crisp when they are scaled onto 4K footage;1080pmakes smaller files.Frame rate—Match recordingfollows this video and names the rate it will use, so the label never disagrees with the file. A fixed rate is available when your editing timeline needs one.Format— see below.Show date and timeadds the moment’s local date and time to the bottom line of every tile, next to the attribution. Useful as context, and as a second way to line the overlay up with footage that burns in its own clock.Include audiokeeps this recording’s sound inside each overlay video, so the editor can align it against your own footage automatically. Mute the tiles after syncing.
Transparent video or fill + matte

Transparent videois a single video that carries its own transparency — an alpha channel, HEVC with alpha. It composites directly in Final Cut Pro, Apple Motion and iMovie on a Mac: drop it on the layer above your footage and the gauge simply floats there. Save it to Files — saving it to Photos can strip the transparency out.Universal (fill + matte)is a double-height video: the picture on top, a black-and-white mask of it below. Any editor with a luma matte or track matte can use it — DaVinci Resolve, Adobe Premiere Pro and After Effects, CapCut, Kdenlive, Shotcut and the rest. Put the top half over your footage and use the bottom half as its matte.
If you are unsure which your editor wants, export Universal (fill + matte):
every editor with a matte can use it. And if a transparent tile ever appears on
a black rectangle, that is the editor ignoring the alpha channel — switch to
fill + matte.
While it exports, and what you get
Each overlay is rendered in turn — the progress panel names the one it is on,
for example Overlay 2 of 4 — Pitch & Roll — and the finished files are handed
to the normal share sheet together, ready for Files, AirDrop, or a cloud folder.
Every overlay video carries an attribution line at the bottom of the tile:
Recorded with Compass 55. It is on every tile, on every tier, and cannot be
switched off. Show date and time shares that line.
A few limits worth knowing before you plan an edit:
- Night Vision recordings are not offered: their display is part of the recorded picture, not an overlay.
- Overlay videos need the paid export capability, like full-length and clean-original exports — see the PRO upgrade .
- Overlay videos are exported from the data as recorded. Changing the overlay layout afterwards changes new exports, never the original recording.
The same gauges without filming anything
You do not have to record video to get these overlay videos. A GPS track can record motion data on its own — no video, no camera — and the same gauges are exported afterwards from the track’s own screen. See Overlay videos from a track .
Interruptions, storage, and privacy
Video recording is a foreground camera activity. Closing the camera, moving the app to the background, app termination, or a capture interruption stops the recording. The app saves the playable material completed up to the interruption.
Loop recording limits the retained time window, but it still needs working space while recording and assembling the final video. Check available device storage before a long session.
Original video and recorded telemetry stay on the device until you choose to share or export them. A stamped export is a new presentation file; it does not overwrite the clean Original.
Secure the iPhone in a suitable mount before driving or riding. Set framing, audio, stabilization, and overlays before moving, and do not operate camera controls while responsible for a vehicle.
Good first setup
- Open
Video settingsand start with Standard stabilization. - Confirm Video quality and microphone state.
- Turn on the pre-recording audio level and check that it responds.
- Add only the overlays you need and keep important parts of the camera view unobstructed.
- Make a short test recording.
- Open it in Videos, compare Original and Stamped, and test the timeline.
- Export a short range before depending on the setup for a long recording.
- Use Loop recording when the recent window matters more than keeping the whole session.
Related pages
- Overlay videos from a track — motion data with a track, no video, and the same gauge videos afterwards
- GPS tracking
- Pitch & Roll
- G-Cross
