Overlay videos from a track: motion data, no video
Your camera films the drive; this app knows what the vehicle did. Turn on motion and audio data for tracks and the app records the sensor data alongside a normal GPS track — no video is recorded — and afterwards the track’s own screen exports Pitch & Roll, G-Cross, Speed and Map as transparent overlay videos: telemetry gauges with nothing around them, ready to be laid over the footage you filmed on a GoPro, a DJI Osmo, an Insta360, a dashcam or another phone — a camera riding the same vehicle — in iMovie, Final Cut Pro, DaVinci Resolve, Adobe Premiere Pro, After Effects, CapCut or any other video editor.
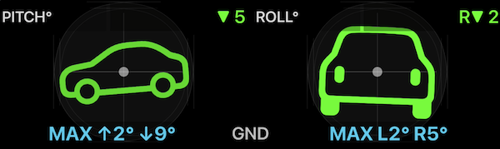
That is one exported file: the gauge, its own video, everything around it transparent, ready to be a layer in any editor.
If you record video in this app instead — the Action Cam — the same export is available directly from the recording; see Video recording, replay, and data overlays .
Turn it on before the drive
Open MENU, then the settings button inside the NEW TRACK button. This is the
GPS tracking settings screen; scroll to the bottom, to Motion and audio data.
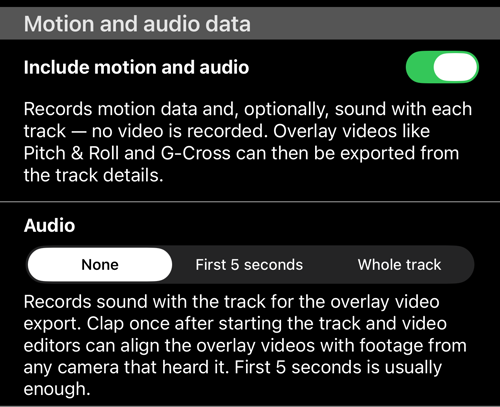
Include motion and audiois off until you turn it on. With it on, every new track also records motion data. Nothing else about tracking changes, and no video is recorded.Audiodecides whether sound is recorded with the track:None,First 5 seconds, orWhole track. It applies only while the switch above it is on.
The microphone is asked for the first time you choose to record sound, not in
the middle of a drive. If permission is refused, the choice returns to None;
allow the microphone for this app in the system Settings if you change your
mind.
Before you start a track, the NEW TRACK button’s summary ends with what will
be captured, so it is confirmed before you drive off: ⛁ None.,
⛁ Motion., ⛁ Motion, Audio (5 s). or ⛁ Motion, Audio.
What the sound is for
It is a sync head, not a soundtrack: one sound that every recorder hears, so a video editor can line them up from the waveform. The order matters.
- Start your cameras first — all of them. A camera that is not recording yet cannot hear the clap.
- Start the track.
- Clap once, straight away. With
First 5 seconds, the app’s microphone is open only for the first five seconds of the track, so the clap has to happen inside that window. WithWhole trackyou can clap at any moment, as long as every camera is already running.
Clap where all of them can hear it — one sharp sound, not a word — and, if you are in a vehicle, before the engine and road noise take over.
Every exported overlay video then carries that clap, and the editor aligns the overlay against your footage automatically.
Recording sound costs almost nothing in storage next to the motion data, but two honest limits apply: a phone call, Siri, or another audio interruption ends the track’s audio permanently rather than splicing a silent gap into it, and a sync head only helps an export that begins where the clap is.
The phone rides with the camera
The gauges describe the phone, so the phone has to be on the same vehicle as the camera: the quad, the truck, the bike, the boat. Footage shot from somewhere else — a camera on the roadside, or one following you from the air — is filming a different object, and the pitch and roll of your phone will not match what the picture shows.
The mount matters just as much. Held in a hand or loose in a cupholder, the gauges record the hand, not the vehicle, and the export is honest nonsense. A rigid windscreen, dash or bar mount is what makes the attitude gauges worth exporting. Speed and Map are more forgiving: they describe where the phone went, which is where you went.
Review the drive on the track screen
Open MENU > TRACKS and tap the track. When a track carries motion data, the
view options offer Map + pitch & roll + chart.
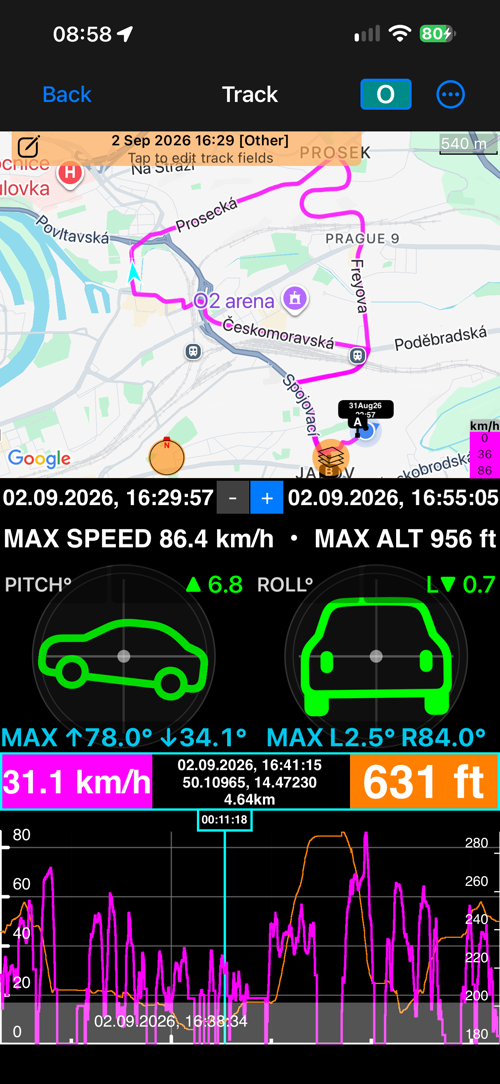
The chart cursor is the single scrubber: move it and the map marker, the values band and the two instruments all follow it to that moment. The instruments are read-only here — this is the recording played back, not a live gauge — and they use the same ground or relative reference as the video overlay.
This view is offered only for tracks that have motion data. Because the view
choice is remembered for all tracks, a track without motion data opens in
Map + chart instead.
Export the overlay videos
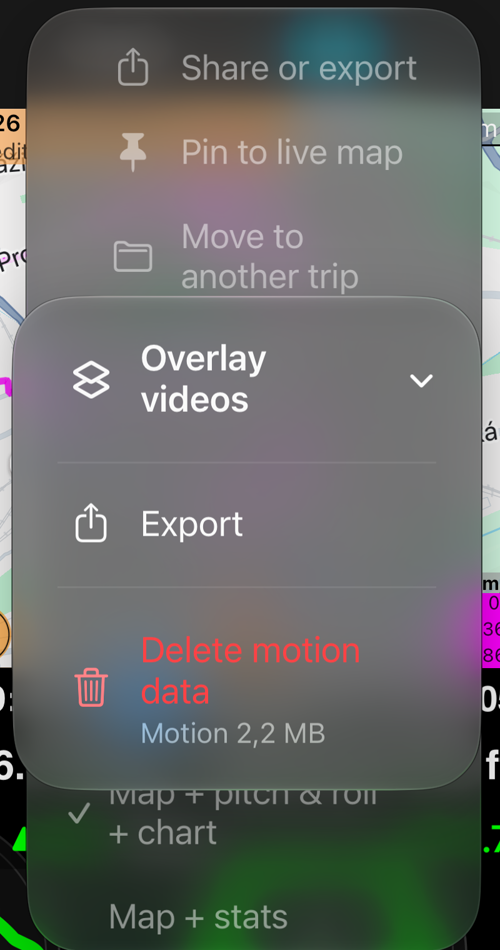
On the track screen, open More. The menu carries Overlay videos above the
view options.
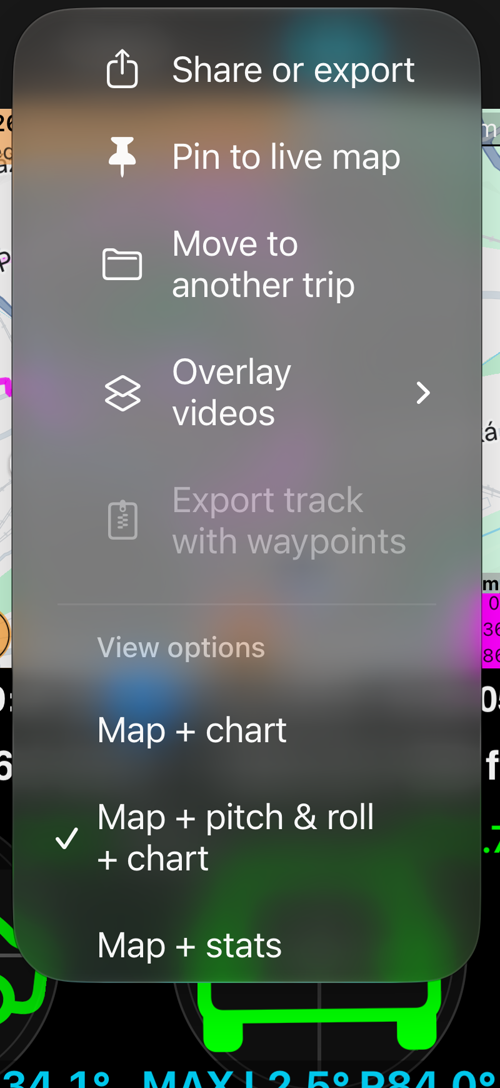
Export opens the same options used for a recorded video.
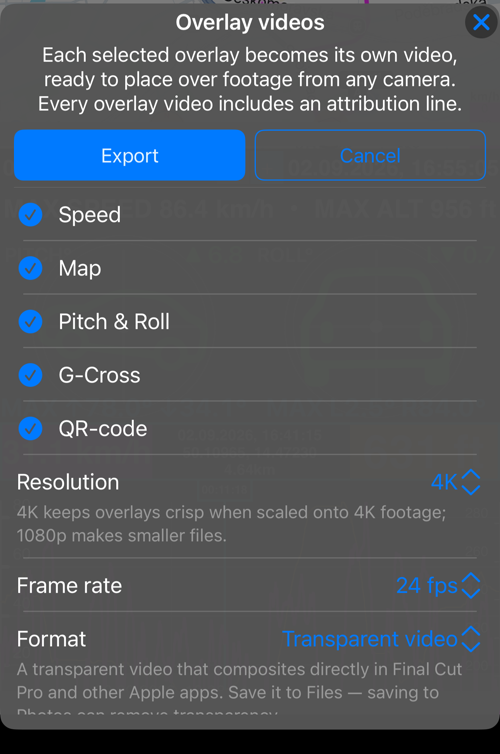
Each selected overlay becomes its own video file, cropped to the gauge itself. What a track can offer:
- Speed and Map come from the track’s own points, so they are available for any finished track.
- Pitch & Roll and G-Cross need the motion data — they appear only for
tracks recorded with
Include motion and audioon. - QR-code is offered as on a video; its payload follows the recorded location.
- The watermark is not offered, here or for a video: it never changes, so a video of it would be a still image played back. Drop your logo straight into the editor instead.
- Motion Quality and Video Diagnostics are not offered either: they describe a recording made by the camera, not a track.
An overlay is exported even if you have it switched off in the app’s video overlay layout. A tracking user may never have opened the camera at all, and that should not cost them a gauge.
The settings underneath — Resolution, Frame rate, Format, Show date and time, Include audio — work exactly as they do for a recorded video, and are
described in full on the
video page
:
Transparent videocarries its own alpha channel and drops straight into Final Cut Pro, Apple Motion and iMovie on a Mac. Save it to Files, not to Photos, which can strip the transparency out.Universal (fill + matte)is a double-height file — picture on top, its black-and-white mask below — for DaVinci Resolve, Adobe Premiere Pro and After Effects, CapCut and any other editor with a luma or track matte.
A track has no source frame rate, so Match recording is not offered; pick the
rate your editing timeline uses — 24, 25, 30 or 60 fps. The audio row appears
only if the track recorded sound.
Each overlay is rendered in turn, the progress panel naming the one it is on, and the finished files arrive in the normal share sheet together.
Two things to know before planning an edit:
- A track export always covers the whole track. There is no A–B range for tracks yet.
- The direction shown on the Map tile is derived from movement between track points, not from the compass. Standing still, it holds rather than spins.
Exporting overlay videos is part of the paid video export capability. The recorded data itself is always yours: the deletion rows below appear whether or not you can export.
Put the overlay on your footage
The steps are the same in every editor; only the names differ.
- Import your footage and the overlay video onto the timeline, the overlay on the layer above the footage.
- Line them up. If the track recorded audio, both clips carry the clap:
most editors can align them from the waveform automatically (
Synchronize Clipsin Final Cut Pro,Auto Align Clipsin DaVinci Resolve,Merge ClipsorSynchronizein Premiere Pro), or line the two spikes up by eye. Then mute the overlay — its sound has done its job. Without audio, useShow date and timeon the tile, or a moment you can see in both, such as the start of a turn. - With
Transparent video, that is all: Final Cut Pro, Motion and iMovie on a Mac show the gauge over your footage directly. WithUniversal (fill + matte), split the double-height file: the top half is the picture, the bottom half is its matte. Apply the bottom half as a luma matte or track matte to the top half — DaVinci Resolve, Premiere Pro, After Effects and CapCut all have this — and the black background disappears. - Place and scale it. Each gauge is its own file, so a Pitch & Roll tile can sit in one corner and a Speed tile in another, at whatever size the frame can spare, each shown or hidden independently.
- 4K or 1080p. Export at
4Kif your footage is 4K and the tiles will be scaled up;1080pfiles are smaller and enough for a 1080p edit.
If a transparent tile ever appears over a black rectangle, that editor is
ignoring the alpha channel — export the same overlays again as
Universal (fill + matte).
Delete the recorded data
Motion data is a couple of megabytes per drive, sound rather less, and both sit
outside the track’s own files. The same Overlay videos menu shows what a track
is holding, read when you open the menu, and removes it:
Delete audio, keep motion— only when both are there. The attitude gauges and theMap + pitch & roll + chartview keep working; only the clap sync head is gone.Delete motion and audio data(orDelete motion data, when there is no sound) removes everything recorded for that track. The confirmation says what goes: Pitch & Roll and G-Cross overlay videos and theMap + pitch & roll + chartview. Speed and Map overlay videos stay, because they come from the track’s points.
The rows are disabled while the track is still being recorded.
Deleting a track, or the trip that holds it, removes its motion and audio data
with it. If anything is ever left behind — an interrupted delete, a data set
that arrived by sync — MENU > SETTINGS > Maintenance > Clean up orphaned photos and videos also sweeps up motion data whose track no longer exists, and reports
how much it removed.
A first run
- Turn on
Include motion and audioand setAudiotoFirst 5 seconds. - Mount the phone rigidly, where it will not be moved during the drive.
- Start your cameras — all of them — and check that they are recording.
- Start the track, and clap once within the next five seconds. Drive a few minutes.
- Stop the track, open it from
MENU > TRACKS, and switch toMap + pitch & roll + chartto see whether the attitude looks like the road. More > Overlay videos > Export, pick Pitch & Roll, keep the audio, and export.- In your editor, drop the tile over your footage, align it by the clap, mute the tile, and scale it into a corner.
Related pages
- Video recording, replay, and data overlays — the same export from a video recorded in this app
- GPS tracking — recording tracks
- Pitch & Roll — what the attitude gauge shows
- “Map + speed and altitude chart” track view — the chart and its cursor