GPS Camera 55. The point editor's Advanced view: altitude, address, heading, course, and field-by-field photo sync.
The point editor opens in its compact Simple view. This page is about the other one: tap ⋯ and choose Advanced under View to add Altitude, Heading and Course as their own sections and turn the photo row into an expandable Photo section with one row per field the image can carry.
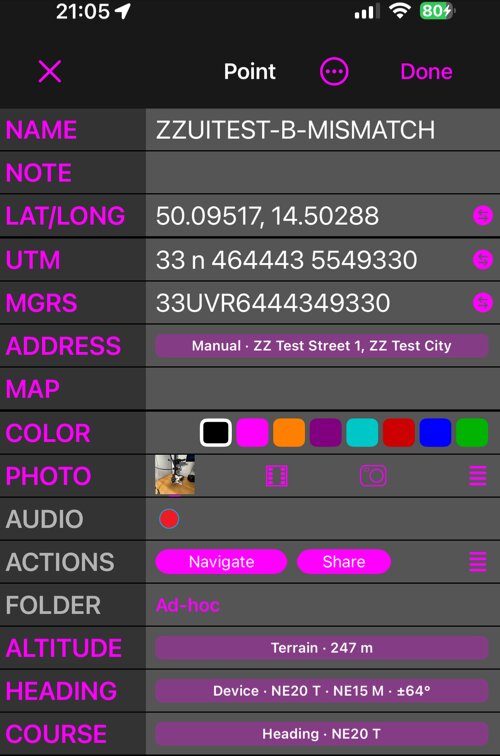
The choice is remembered for the next point you open and survives closing the app. Switching views is only a change of presentation: it never saves, never discards, and never alters a value. You can switch mid-edit and your unsaved typing stays with you.
Each of the new sections is collapsed to a summary chip that names where its value came from — Terrain · 247 m, Device · NE20 T · NE15 M · ±64°, Heading · NE20 T, Geocoded · V Třešňovce 227/12. Tap the section to open it. One section is open at a time.
Finding a value is not the same as using it
This is the rule the whole editor is built on, and it is worth reading once:
Find, Search and Measure only offer a value. Apply, Restore, Clear — or an action that says what it will do — is what changes the point.
So you can look up the terrain elevation, read what the photo says, and search for an address without committing to any of them. A row you have not acted on has changed nothing.
Altitude
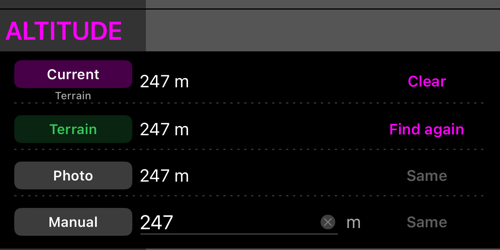
- Current is the altitude the point holds, with its source underneath — GPS, Terrain, Manual, Imported or Photo — and the GPS accuracy where there is one. Clear empties it.
- Terrain looks up the ground elevation at the point’s coordinates. Tap Find; the result appears beside the row with the difference from the current value, and Apply puts it into the point. Afterwards the button reads Find again.
- Original appears when there is something to go back to, and Restore returns the altitude the point had when you opened the editor.
- Photo shows the altitude stored in the attached image. Same means they already agree; otherwise Actions… offers Apply from photo or Sync current to photo.
- Manual takes a figure in your current altitude unit, above or below sea level.
Move a point and its altitude stays visible, marked as belonging to the previous location, so you can see that it needs attention. The app never quietly swaps one altitude for another.
Address
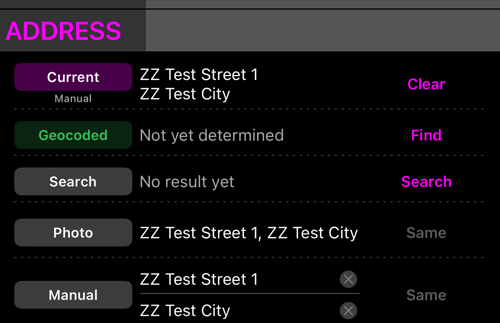
- Current is the address on the point, captioned Geocoded, Manual, Imported or Photo. It turns orange and reads Coordinates changed when the point has moved since the address was found.
- Geocoded turns the point’s coordinates into an address. Find, then Apply.
- Search looks up a place by name. The result gets an Actions… menu, and the wording tells you exactly what each choice does: Apply address only takes the text and leaves the point where it is, while Apply address and move point moves the point to the place you found. A search result never moves the point on its own.
- Photo is the address embedded in the attached image.
- Original appears when there is an earlier address to go back to, and restores the one the editor opened with.
- Manual is two free-text lines. An empty line is not a hidden way to clear the address — use Clear on Current for that.
Heading and Course
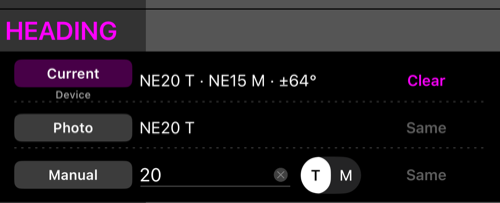
Heading is which way the camera was pointing. It is what a photo stores as image direction. Current shows both references — NE20 T · NE15 M — with the measurement accuracy, and the manual row has a T / M selector so you can enter a true or a magnetic bearing.
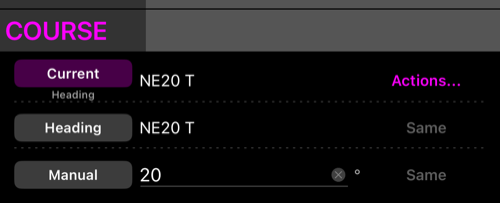
Course is which way you were travelling, which is often not where the camera was aimed — think of a photo taken sideways from a moving vehicle. Course is deliberately not photo metadata: it has no Photo row and never becomes image direction on its own. If the two genuinely are the same, Current → Actions… → Use as heading copies it across explicitly, and you can then synchronise Heading to the photo.
Photo size and drawings
The first row of the expanded Photo section shows the attached photo’s pixel dimensions and file size. Tap Resize… to choose a smaller maximum longest side, down to 640 px. The confirmation shows the current and resulting dimensions and file sizes. Confirming replaces the photo stored in the app immediately; cancelling the point editor later does not restore the full-size file. The photo keeps its aspect ratio.

Editable drawings and text scale with the photo and remain editable in its preview. Text linked to a drawing remains linked after resizing.
The photo and the point, field by field
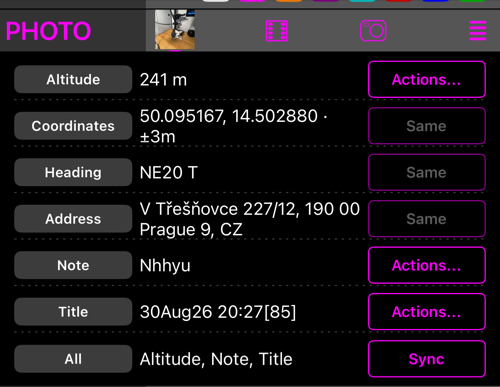
In Advanced view the Photo section keeps the thumbnail, camera, library and attachment buttons, and adds a row for each field the image can carry:
- Altitude
- Coordinates
- Heading
- Address
- Note
- Title
The middle column is what the photo currently holds. The button offers the direction that makes sense: Apply when only the photo has a value, Sync when only the point does, Actions… when both have one and they differ, and a greyed-out Same when they already agree.
Coordinates compare their accuracy too, so a matching position with a different ± still counts as a difference worth offering.
The last row, All, lists every field currently out of step and offers Sync — Sync all to photo or Sync all to point. It only ever copies values across; it never removes anything.
Copying one field across leaves the image’s other metadata alone, and the picture itself is untouched: after a metadata write the file has the same dimensions, the same orientation, and pixel-for-pixel the same image. There is no re-compression and no loss of quality, however many times you sync.
Updating the photo with everything
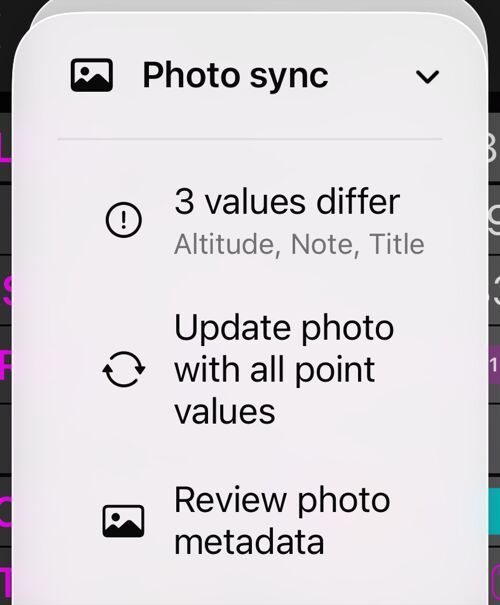
The ⋯ → Photo sync menu opens with a status line — No changes to sync, or 3 values differ with the field names beneath. Tapping that line opens the save-time sheet in review mode, so you can write to the photo without saving the point.
Update photo with all point values is the one-tap version, and it still shows you the sheet first, with every difference switched on — including differences that were already there before this edit. Look at the list, switch off anything the photo should keep, and confirm with Update photo. Cancel writes nothing at all.
Review photo metadata simply switches to Advanced view and opens the Photo section.
Removing a value from the photo
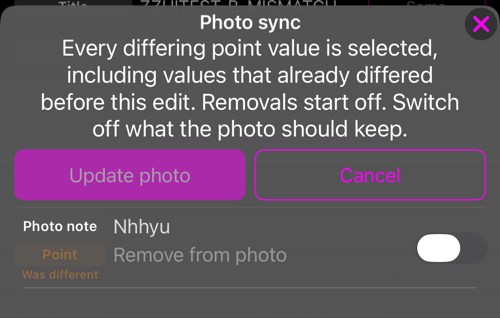
Clear a title, note, address or altitude on the point and the photo is still carrying the old one. The sheet — at save time or in review — then offers that field with Remove from photo where the point’s value would be — and the switch is off, in every mode, every time.
Only your own switch removes anything:
- The automatic Update photo metadata setting never removes. If a removal is the only thing pending, the save goes through and the photo is left alone.
- Sync all to photo in the Photo section never removes either.
- A field the photo has and the point never had is offered the same way, off by default.
A removal is thorough: the value is taken out of the image’s own field and out of the older places a reader might fall back to, so it does not reappear in another app. Coordinates are never offered for removal.
When a photo cannot be read or written
The Photo rows and the status line say what is happening:
- Unavailable — the point has no attachment.
- Download required — the image is in iCloud and only a placeholder is on this iPhone. Download it and the rows fill in.
- Loading…, Applying…, Saving… — a read or write is running. Done waits for it, and the ⋯ button becomes a spinner meanwhile.
- Metadata unavailable with Retry — the image’s metadata could not be read.
A metadata write needs room for a temporary second copy of the image, so a nearly full iPhone can make Updating photo… slow. If a write fails, the point is not saved and the photo is left as it was.
Related
- The point editor — the Simple view this page builds on, and what saving does with the photo
- Coordinates converter — also reachable from the editor’s ⋯ menu