Camera Rig — Mount & Recording Stability Evaluation
Find out whether your phone or camera mount is stable enough for recording. Camera Rig is useful for dashcam setups, content creation, ride-quality checks, and any before-and-after test where you want to know whether footage stability actually improved. Every session is linked to a GPS track, so you can review the result in the context of the route where it happened.
Best for
- dashcam users testing mount quality
- content creators comparing mounts, positions, or damping
- fleet or field users who need repeatable recording stability checks
When to use this
Use Camera Rig when the real question is whether one mount, position, or damping change produced smoother recording.
When not to use this
Do not use Camera Rig when you mainly want to compare road surface quality independent of the mount. For that, use Road Survey .
What you get
- a live stability-oriented score view
- a saved session linked to the route via GPS
- before-and-after comparison across repeated runs
- a report you can share after labeling the sessions
FAQ
Can I use this to test a dashcam mount?
Yes. That is one of the clearest uses for Camera Rig. Run a baseline, change one thing about the mount, then compare the sessions.
Can I compare two routes with it?
Yes, but only if mount position and phone setup stay the same. If the route itself is the main thing you want to judge, Road Survey is usually the better profile.
Mode
Open MENU > Modes > Engineering > Camera Rig.
Use this mode when you want to compare mount stability before and after an adjustment, test different hardware positions, or judge whether a route is smooth enough for usable footage.
Central area
You can also install the Camera Rig central area directly: open the main panel menu, choose Pick what to show here, then in Screen area options > Engineering choose Camera Rig.
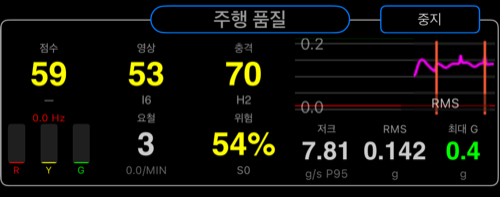
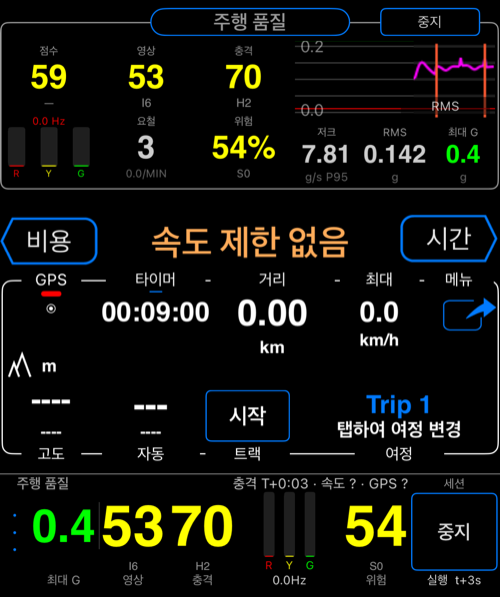
The central area gives you the main live score, the two channel scores, and the current graph view for the active run.
Micro area
You can pair the central area with the compact Camera Rig micro area: open the micro panel menu, choose Pick what to show here, then in Screen area options > Engineering choose Camera Rig.
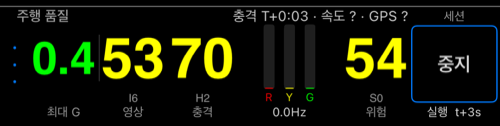
The micro area is for quick live monitoring. It keeps the overall state, short labels, and immediate alert context visible without taking much space.
Settings
Camera Rig uses the shared Motion Quality settings screen.

Preset is the first thing to review. Start with Generic Device if you want the Camera Rig profile with balanced sensitivity and a sensible baseline for a phone in a case on a medium mount.
Session flow controls max session duration and whether the saved-session details prompt appears after saving.
This section is worth using because Motion Quality sessions always run together with a GPS track. START always asks whether to join the current track or start a new one. STOP always shows the save or discard flow. If the linked track ends on its own, the session also ends and auto-saves.
Thresholds & scoring is the advanced area. Camera Rig emphasizes stability at 65% and impact at 35%, with higher weight on gyro activity and jerk because those matter strongly for footage quality.
This area is more than raw thresholds. It also lets you:
- change
Frequency scoring - change
Score weights - rename the displayed score labels
- save the current tuning as a custom preset
- export or import presets
- reset everything back to the selected preset
That means you can build a stricter footage profile for one mount, export it, and reuse it later instead of tuning from scratch each time.
Live alerts is optional and mainly useful when you want immediate feedback during capture instead of review afterward. The toggles are separate:
Hard impact alertsDevice stress alertsInstability alertsHapticsSound
So you can, for example, react only to instability while ignoring hard impacts, or do the opposite.
Good first setup
- start with the
Generic Devicepreset - run a baseline on your typical route and mount position
- compare a second run with one variable changed
- adjust payload and mount settings only after the baseline behavior makes sense
Want a complete workflow? See How to Compare Camera Mount Stability .